Wednesday 19 June 2013

Target Locked...

Checked in with the support forum at UltraMon today, and got a couple of pointers back VERY quickly. As it happens, the application was operating exactly as expected. There's a couple of caveats with the resolutions switching, but in essence, having the primary monitor on the left causes the screen area to shift. 

I borrowed the wife's monitor this evening, set it up as a secondary monitor, told Windows it was on the left (It isn't, just in case the pics below confuse you).

It only took a short while to prove that the concept works! 

Running the mirror in a Window for testing.
When not in flight, the screen is blank as the mirrored screen area is invalid.


XWA switches to 640x480 during the start screen, and in the flight hanger, whilst running the game engine in HD means I am trying to capture an area around the (700,800)-(1300,1080) mark. This means that from the point the application is started, to the point one is in flight, the second screen is blank. As soon as the game starts, the targeting screen hits the display. PERFECT

Running the mirror in full-screen, between missions.
There's no way I could "Draw" over the Direct 3D image.
A bit of Tape helped to find the correct area.
I have the exact settings saved, but they will change when I settle on a final resolution.

The images below are taken after turning off the cockpit.This has no effect, it's just by habit.

 
In Flight, no target.

The final image below shows the main monitor (physically left) running the updated game engine at 1920x1080. The game plays with no noticable impact on performance.

The portion of screen containing the targeting computer is shown, real-time and full screen on the second monitor.
Pew! Pew!

There seems to be an issue with flickering on the target display... but only on occasion. Generally it runs as hoped. A little tweaking or extra memory should fix this.

At the moment, it seems low quality, but it's stretched to a widescreen 19" panel.

Now that I know this works as well as it does, I will be looking to get hold of a small monitor, something like a Lilliput, but it will have to be quite a bit cheaper!

Tuesday 18 June 2013

Here's Where the Fun Begins...

(Amusing Note: Apparently the Blogger.com spell-check doesn't recognize the word "blog")

So far, this blog has recorded me setting up a PC, installing a couple of programs, and setting up a retro Joystick. This isn't much to get exited about. Now that I have the basics done and dusted, it's time to start branching into the more esoteric.

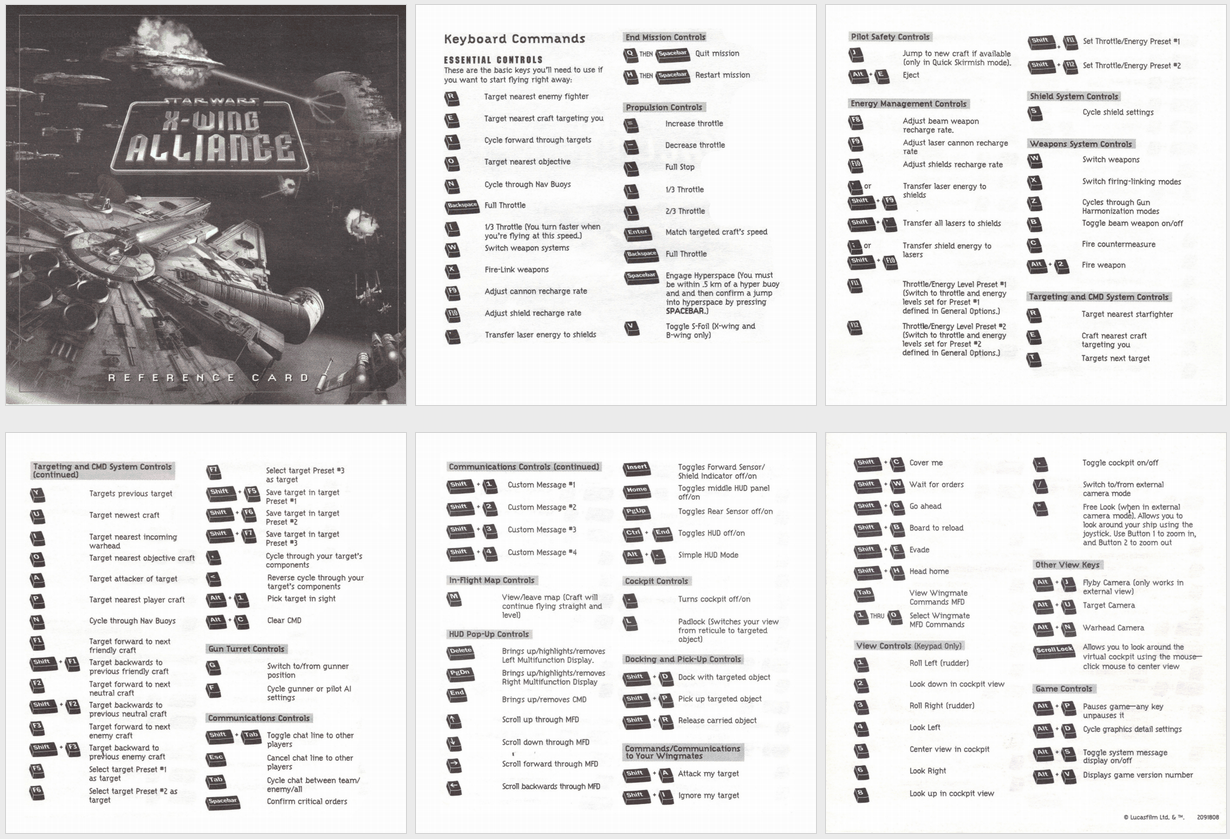
My aim is to make the game a little more immersive. The first idea I had is to pull some information off the screen, and put it directly in front of the user.

If you recall, in the original movie trilogy the X-Wing had a nifty little targeting system/range finder 

Which incidentally, is available as an awesome GPS App!

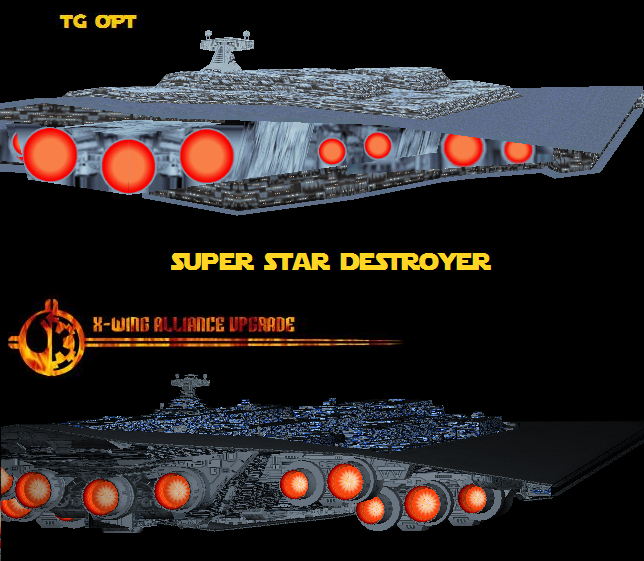
This was replicated reasonably well in X-Wing, but had a major overhaul in XvT and XWA.

XWA targeting display:

This shows information about the currently selected target. I want to port this to a second screen: Just for kicks at the moment, but should I succeed in my cockpit desire, I want this front and center.

Some games support multiple displays. Sadly, XWA is not one of them. It's possible to map the screen across a number of monitors, but as far as the game is concerned, there is one screen, and one screen only.

The target display is different on each craft, but is always in the same location. Sadly, this location is hard-coded in the application, and better minds than mine have been unable to alter this.

Recently, I stumbled upon the application UltraMon. This application gives one far greater control over multi-display systems. Usually this allows for a second task bar, easy screen switching etc. One of the less-used features is a partial screen clone/zoom, allowing one to clone part of ones monitor, and display it solely on a second display. This is aimed, no doubt, at the visually impaired, or those wanting to run presentations or the like.

In my last post, I mentioned I would be using the iPhone. This was to be via an application called iDisplay. iDisplay is a handy little app available in the App Store (not very expensive) that connects to an application on your desktop and turns your iOS device into a wireless, touch-screen monitor. I've used it once or twice while programming (need to leave the room but don't want to disconnect from what you're reading? Just pick up and walk... obviously I don't mean work while walking... unless you wanted to). This was going to be my second monitor while testing, not least because it's about the right size.

Sadly, this was a no-go. The iDisplay desktop application is quite resource-heavy. Even setting it lower down on the process priority list did nothing to alleviate the lag on the system. Evidertly the single core low-spec system is not up to the task.

At this point I am merely proving a concept, so I will just run with UltraMon and a second monitor for now.

Intermission!

The next thing on my to-buy list is a second monitor for my desktop PC. At the moment I only have one. I looked at the wife's monitor, and really couldn't be bothered to disconnect the various cables and paraphernalia. Instead, I connected the second port of the monitor to the PC, and I've been switching between modes to review the output.

UltraMon didn't work!

There's an option to enable/disable 3D acceleration, but it didn't make a difference. Fortunately, there's a plugin called MirrorMon that allows multiple mirroring (multiple screen sections? Interesting...) which seems to handle Direct3D a lot better:


MirrorMon running on Monitor 2 (Windowed Mode)
Full Screen, this is an exact replica of Monitor 1

The Hardware Acceleration was disabled...
Swapping the Displays resolved this.
Look at the difference!!

Output from Second Screen

At this point, Ultramon has successfully cloned a 1920x1080 Direct X display to a second monitor.
Sadly the performance on the main display isn't great, and the redraw rate on Monitor 2 is unbearable.

Changing the resolution of the second screen had an interesting result:


 It's mapped the output to the correct size, and performance is perfect, but the monitor itself is still at the same resolution as Monitor 1. This is a conundrum.

As previously noted, I will be playing in a resolution supported by the Projector, which will have an impact, but for now, I'm leaving this here.

Next Step is to connect a second monitor and see if I can get better results. Particularly, I want to map a portion of the screen to display 2, not the entire screen. This is proving very difficult with only one screen to test with.

Thursday 13 June 2013

Eye Have a Spelling Chequer...

Took me ages to figure out why I couldn't assign any shield-based commands to the WCS. Turns out the idiot that wrote the XWA template doesn't know how to spell Shield. Anyway, I've assigned commands to all 6 buttons on the WCS, and one to both RKR positions.


Buttons 1-3 are being used for targeting, namely:

Button 1 selects the nearest enemy craft that is targeting the players' ship.
Button 2 selects the nearest enemy fighter.
Button 3 selects the target currently in view.

Buttons 4/5 adjust the Shield/Laser recharge rates.
Button 6 adjusts the current shield configuration.

Technically, I can assign up to 3 commands to each button, and select the command by toggling the Rocker (RKR) button. However, this is already proving to be a paradigm shift, albeit a positive one. For now, I'm using the "UP" position on the RKR (listed above as "BTN T7") to close the crafts S-Foils, If applicable. The "Down" position is being used to enable the crafts Beam Weapon. Both of these commands are toggle-based, meaning pressing "b" once on the keyboard enables the Beam, and pressing it again disables it. Fortunately the WCS allows me to assign commands to the key-up events of every button, including the toggle positions (so returning the Rocker to the middle from the UP position registers a separate event to returning it to the middle from the DOWN position). In effect, this means throwing the switch UP closes the ships S-Foils (and turns on a red light!), returning it to normal opens them again. Likewise, setting it to Down turns on any Beam Weapons, as well as a nifty green light.

This isn't perfect of course, if one flips the switch back to the middle position while the foils are closing, the orientation is suddenly reversed, meaning you can't activate beam weapon because the foils are closed, and trying to open them puts you in an impossible position. Ah well!

I've flown a couple of test flights, and I'm happier with this layout than what I started with. I did have buttons 1-3 and 4-6 swapped, but It felt wrong. I was instinctively using my index finger to target, and kept turning my shields off!

Here ends the basic configuration of the game. Right now I have a fully working, very pretty install of XWA with a control system I need to get used to, but so far feels very slick. I'm missing the Blackhawk, and just might fire it up for a spin with the throttle one evening. 

In the meantime, I will be playing through a couple more test flights while I start to put together some very interesting ideas next. First idea involves the targeting HUD, and for now, an iPhone(!).


Tuesday 11 June 2013

Briefly

Just a short post this evening. I wasn't able to upgrade the RAM on the system, as my only 1gb DDR2, NON-ECC memory module was dead. The second HDD was causing so much trouble I finally switched it out. The system now operates with two 7200 rpm 160GB drives. It's a little overkill, but with the game now running from a BIN/CUE file on the second disk, and the system having it's swap file on there as well, there's a noticeable performance increase.

I cleaned, and repaired the system chassis, as well as tidied up the internal wiring, much nicer as a box now. I intend to have it enclosed at some point, but it's nice as is for now.

Finally, I've noticed that the Talon does NOT send the ALT key from the trigger when set to Keyboard mode (i.e. the LED is ON), which means all buttons on the Talon, with the exception of the trigger (i.e. the PEW! PEW! button) operate the same on both modes. Switching to keyboard mode renders the ship incapable of firing(!)

I took the game OUT of the startup menu, it was loading too quickly, causing issues with some other Windows Services. Not a big deal,  I will hard code a shortcut key soon.

That's all for tonight!

Monday 10 June 2013

A Little Eye-Candy

Not that I'm obsessed or anything, but I spend most of this evening hacking a BIOS Rom file.
Running an unusual Phoenix BIOS makes it much harder than normal to do this, as the Logo image isn't stored in the usual place.Adding a logo prevented the flash utility from running, removing the existing file from a downloaded ROM didn't seem to help either. In the end, I backed up the current BIOS image, removed the attribute corresponding to the system logo and inserted the Incom logo instead.

Once confirmed working, I updated the Windows Kernel with a new boot screen. After resolving the ubiquitous Blue Screen(s) Of Death, I set a desktop image (again, the Incom Logo), removed the Recycle Bin (simple Registry entry) and hid the start menu. Finally, I set XWA to launch on startup, and set the Windows sound theme to "None"

Nothing technical achieved, but I think every little thing helps.

BIOS Splash screen

Windows Boot Screen

Desktop - It reads "Incom Corporation"... Honest

Sunday 9 June 2013

Sir Tweaks-a-lot

Having installed and fully patched Windows, I've installed X-Wing Alliance and upgraded to version 2.02. In addition, I've added the Craft Pack from the X-Wing Alliance Upgrade project and used the XWA Hacker to increase the screen resolution to 1920x1080. This may be a temporary measure, as I'm hoping to direct output to a projector at some point. I may need to sacrifice resolution for size when I implement this.

I had to revert to an older driver for the Video card to resolve a major video anomaly, and it took me an hour to figure out why there was no in-game music (audio is taken from CD Audio tracks on the game disk). I thought I needed a CD-Audio cable, but it turns out Digital CD Audio was muted in Windows (D'oh!)

After confirming the game runs as expected, it was time to begin configuring the controls.

The HOTAS is configured in Windows as a 3-Axis, 1-Button Joystickm even though the stick has 4 buttons.

Running the WCS in Digital HAT mode gave me the best results. This gives me a total of 1 trigger, 2 HATs, and 9 physical buttons to play with.

X-Wing Alliance is a beast when it comes the complexity of it's control system, it will take me a good while to get everything configured in a way I'm happy with. The flip switch on the WCS takes me up to 21 useable buttons.

See the Reference Card for an idea of what is needed:


The WCS is configured from a DOS application, and basically involves assigning keystrokes to application keywords, and then assigning the keywords to buttons on the joystick.

Testing the Joystick
Keyboard Map Testing

The Talon came with some handy reference sheets for my convenience (and again, I have to say "Thanks" to the chap who sold me this hardware on eBay, for including the manuals and reference sheets etc.)

At least THIS was easy to configure...

It's at this point I begin to understand the complexity of the HOTAS. The WCS does NOT read the HAT switches from the Talon. It has programming functionality for one HAT, but it does not register anything.
Fortunately, the Talon itself is entirely programmable on its own. Programming the Talon is a lot easier (for the one thing, the manual has a measly 4-pages before switching to German). I've configured both Keyboard-mode on the Talon and the WCS pass-through key mappings the same. If I used them independently, I could have an extra 3 buttons (one assignment for each button 2, 3 and 4 on the Talon), but this seemed over-indulgent. I could actually utilize the three extra configuration keys as well, taking my total number of buttons to 34. Again, this will get too confusing, and I have better ideas.

For now, pressing the fast switch on the Talon does nothing more than turn on the important-looking LED next to the Castle Switch. Switching presets would have "interesting" results mid-game. As it is, I want my four stick buttons to do a simple set of commands. I'll utilize more on the WCS.

Programming the device without Software? Inconceivable!


The Thrustmaster Resource Center has a config for XWA. I've taken that as a starting point, and modified to my own preferences. This is a process that wasn't easy. The manual for the WCS is 84 pages in English, and comes with two additional supplements. It's a jovial read, however, once one gets past the abbreviations and esoteric details. I quite liked the "believe it or not, that's all there is to it" found on page 46.


Some light reading...

There are 124 commands listed for the game. Theoretically, I won't have use a large selection of these (I don't think I've ever told a wing-man to "Head Home" before the mission finished). I can assign 30 of these to the HOTAS, but I will likely keep the hands-on control system as purely flight-orientated. I have other plans for most of the wing-man commands, shield management and docking commands.

After several hours getting to understand the HOTAS and its configuration, I have fully configured the Talon, and now I just have to decide what commands I want to assign to the WCS.

Remember:  we're not configuring a game's controls, we're mapping game devices directly to keyboard interrupts!


My Current Configuration (Doesn't seem much for several hours, but this is very good work done)


Wednesday 5 June 2013

Tiny Hurdles

I've installed XP without a problem, and thanks to the ZIP drive, I flashed the BIOS to a much higher build.

I do have a couple of hardware issues I'm hoping to resolve before I attempt anything fancy.

First and perhaps most potentially problematic is this:
 

My Video card has no bracket. At some point it's been ransacked, or swapped for a low profile or something. Either way, the card still works. I dare not use the DVI port at the moment as the card is loose without the retaining plate. I've checked out eBay, but for now I've posted on Facebook for anyone to lend me a bracket/card. A couple of folks are helping out it seems, so this won't be a problem for long.


The second HDD is causing issues. I would replace it now, but it was a real bitch to get into the machine, so I will wait until I have a solution to the video card, and replace both together.

I had to replace a MOLEX->SATA power cable, and the power button is stiff as hell...

Other than that, all going well. I want to get the OS stable before I start with XWA.

Tuesday 4 June 2013

No Joy...

I've spent the last 3 nights trying to get the computer to speak to the Thrustmaster WCS.

My first problem was connecting the device. The SB Live! gave me the game port, but both the WCS and the Talon require a keyboard connection. The WCS uses keyboard for it's array of buttons and switches, and the Talon, although running in Joystick mode, requires the additional voltage to operate properly. Being ancient devices, they were expecting AT keyboard connectivity.

The PC has a PS2 keyboard input, so a quick trip back to eBay yields the following adapter:


"This should be fine" I thought. After all, AT and PS2 are identical, apart form the pin layout.

The problem, however, was that I was running a USB keyboard via KVM while I build the thing, and there seems to be no way to make the PS2 port work at the hardware level, without a physical keyboard being connected at boot. I disabled legacy keyboard in the BIOS, to suddenly find myself without a working keyboard at all.

The Talon came to the rescue, in the end as it has a PS2 through port as well as an AT through port.

As Windows XP would not allow access to the WCS via the keyboard port, I installed a windows 98 version of DOS onto a Zip drive. Installed some DOS Sound Blaster drivers and tried again.

The software (incident supplied on a Floppy!) still didn't work.

Fortunately, I found updated software at http://thrustmaster.vanree.net/ (An excellent resource for like-minded people!). IT WORKED!

It had taken a lot of effort, but I finally had a system capable of running X Wing Alliance Upgrade, with a robust, heavy, (very) responsive programmable HOTAS.

I booted to DOS after configuring the config.sys (Now THAT'S Nostalgia) and ran the setup application. I turn left it alone for an hour as I looked through the (three) manuals for the WCS.

I can't believe what  a steal this hardware was, not to mention the excellent condition it's been kept in!

Next I need to install the OS.


The setup is currently as follows:


Hardware, baby

Choosing the right hardware for any gaming project is important.
This game is 14 years old, so there will be little demand for a high-cost rig.
The upgrade project adds a  hell of a lot in terms of graphics, sound and game-play, but it doesn't change the fundamental core of the game. 

One of the biggest contributors on hardware is the HOTAS system. Both the throttle and joystick use a 15-pin game-port connector. There are convertors available to use USB, but they are unreliable at best. I've been playing X-Wing on a dual boot OS on my desktop (I run windows 7 x64 at the moment, with literally NO hope of talking to the game-port).

To separate my gaming from my desktop, I have a second PC, which will be used specifically for this project.

  • 1.8Ghz Single Core CPU (The game won't recognize a second core, and I wont be running much else on the system. XP will be happy with this).
  • 756MB DDR2 (I did want 1 - 1.5GB, but this is all I have spare at the moment, and to be honest, I can't see me needing anymore)
  • Creative Sound Blaster Live! -  This was mainly to provide the system with a game port, but this 13 year old PCI card blows the crap out of the on-board sound anyway.
  • GeForce 7200 GS - Probably overkill, but I want dual monitor support (more on that later)
  • 2 x SATA HDD - Again, probably overkill, but I want to run the CD audio from a Disk Image on the second drive - I find this to be more reliable (and less noisy) than running CD Audio from the Optical Drive.
I'll be running Windows XP for the game(s). This presents a problem with the Thustmaster WCS, as programming the unit cannot be done from an NT-based system. To resolve this, I dug out another old piece of kit:


Running a Windows 98-based version of DOS from an internal 100MB ZIP drive allows me to configure the Sound Card, and the HOTAS from a compatible kernel.


eBay fun

It's funny how looking for nostalgia on eBay shows up far more than expected.

I recently bought a wonderful desk for my computer, after spending a week trying to find a desk close to my old Ikea Jerker. The Jerker was a fantastic, huge desk I picked up from a friend about 12 years ago. It went with me to every home I had for about 6 years, until I got divorced from my first wife, and had to leave it in a house facing demolition :(

Anyway, I was looking for a joystick last week, when I stumbled across a guy selling a complete pc setup, who was willing to "throw in the desk". Lo and behold, it's an Ikea Jerker, identical to my old one. One quick message, and an exchange of cash later, I have my desk:

This isn't strictly for my X-Wing, but it's nice to re-capture glory days of PC gaming in one go.


It wasn't just my desk that I picked up this month, I stumbled across some mad fool selling all of this for less than £5. £11 in total, including postage:


He also threw in a V3 Racing wheel. I'll be playing Carmageddon II as well :p


You'll notice towards the front, in the middle, sits a HOTAS (Hands On Throttle And Stick) pair. This is what got me interested.

Introducing the Thrustmaster WCS Mark II, and the F-15E Talon.


A Question of Joy

The most important aspect in this project, to me, is the input device(s) used to control the game.
I've been playing X-wing using a trusty Gravis Blackhawk:


I got this joystick about 4 years ago. I bought this one specifically because it's the same model I had many years ago when I played XvT. It's a robust, heavy, and responsive 3-axis, 4-button stick. I was also happy to see that Riker agrees in Star Trek: Generations:


The downside is that I could do so much more with some extra axis/buttons, so it's time to retire the Gravis, and go for something with a little more to offer.

I looked at the Microsoft Sidewinders, but they weren't much better than the Gravis. I considered the Saitek x52 Pro but it didn't look right, and it's way out of my budget. All in all, modern USB joysticks seem crap compared to the older generation of heavy duty stuff, unless you're willing to spend hundreds. I'm not.

Choosing the Game

I've been playing the original X-Wing on my desktop for a week or so, but there's better options available.

I've always enjoyed XvT more than the other games, but it's the last game in the series, X-Wing Alliance, that has the strongest Modding Community, support, and even today it has people playing online. Add in the better graphics and device support, and it puts Alliance head and shoulders above the other games.

The first thing to consider was bringing the game up to date. If we compare the original SSD model against the updated model available in X-Wing Alliance Upgrade:


It's worth noting that the Upgrade rescales the SSD to it's proper size (17km!)

That thing is 9km away!

Red 5 Standing By...

Welcome to the Tesco Value X-Wing Project (TVXP).


This blog will track my progress in building my X-Wing Space Combat simulator.
Since I was a brat, one of my favorite series of games has been Lucas Arts' awesome X-Wing series.
From the first time I bulls-eyed a TIE on my uncle's 486, I was hooked.

TIE-Fighter is regarded as the best game in the series, but my favorite was the 3rd game, X-Wing vs TIE Fighter. I recall fondly many long summers creating our own missions and flying wing-man with my cousin.

After rediscovering the games on modern systems, I've finally decided to fulfill a childhood dream and put together a system purely for these amazing games.